Background
General approach for early 1917
The operations at Miraumont were the result of agreements between the British and French high commands and the general plan that emerged for early 1917. The French were to withdraw a number of divisions from the front, form them up into a reserve and then undertake significant offensive operations in the area of the River Oise. The British, anticipating the arrival of additional divisions from home, would extend to take over the south of the Somme front as far as the Amiens-Roye road. The British Fifth, Third and First Armies would undertake local offensive operations in the areas of the Ancre valley, opposite Arras and against Vimy Ridge respectively, to pin down the enemy, draw his reserves into battle, and destroy or capture German forces in the salient west of Bapaume. (General Headquarters order issued to Armies, 2 January 1917) .
The Miraumont operations were undertaken by Fifth Army, which was tasked with attacking in successive stages in the direction of Achiet-le-Grand. On its left, Third Army would be undertaking similar operations on the Beaurains to Roclincourt front; Fourth Army on its right would be standing fast.
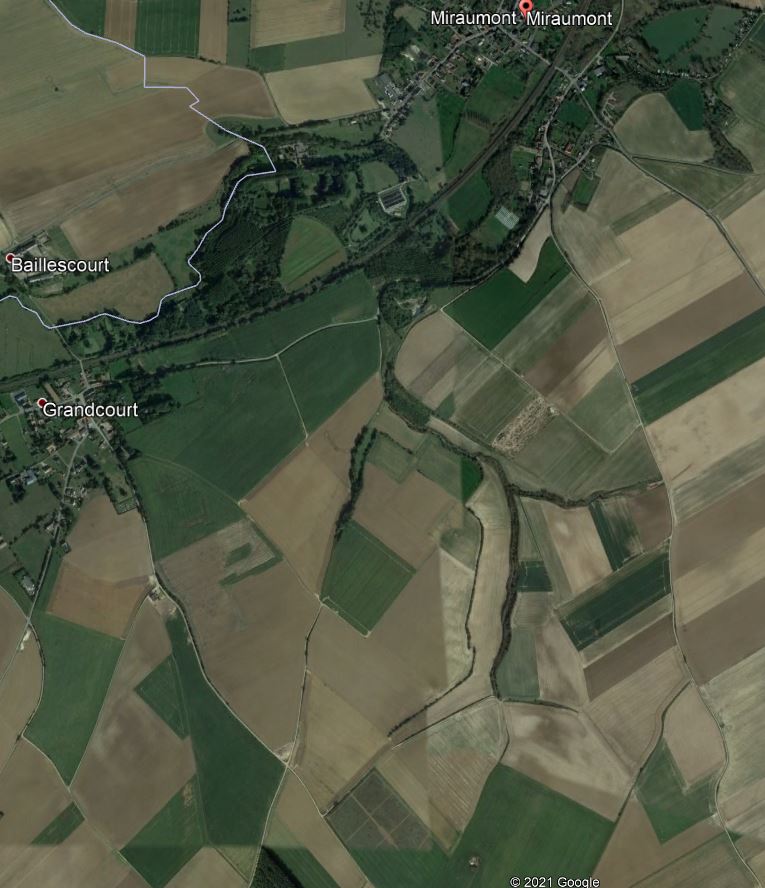
Position of Miraumont using Google Maps

Fifth Army’s plan

For the purposes of these operations there was some reorganisation, which would provide Fifth Army with a total of twelve divisions under four corps. The Miraumont operations were eventually carried out by II Corps, which employed the 2nd, 18th (Eastern) and 63rd (Royal Naval) Divisions – all good, experienced formations. The operations would be in four stages, envisaged as
- 3 February, II Corps captures Puisieux Trench and River Trench (north of the Ancre opposite Grandcourt)
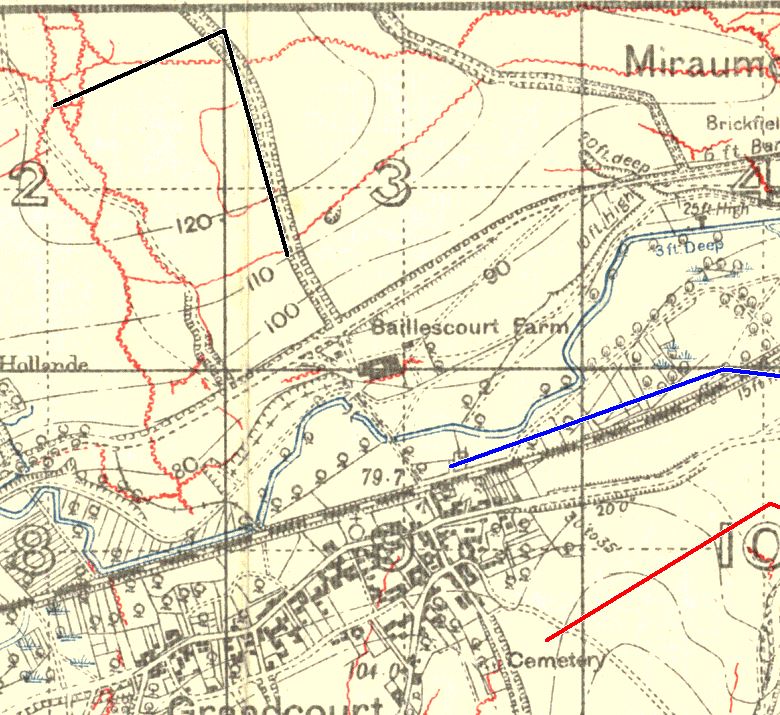
- 20 February, II Corps captures Hill 130, Grandcourt Trench, Tea Trench, Baillescourt Farm and Hollow Road
- 20 March: V Corps captures Serre and Pendant Alley East
- 25 March: II and V Corps capture Pys, Miraumont, and Beauregard Dovecote.

Formation headquarters locations and command
- Fifth Army was located at Toutencourt and under command of General Sir Hubert de la P. Gough
- II Corps located at Senlis and under Lieutenant-General Sir Claud Jacob
Preliminary operations, 3-4 February 1917
Two battalions of 189th Infantry Brigade of 63rd (Royal Naval) Division carried out operations that advanced the line to a position along River Trench, starting at 11pm on 3 February. Its objectives were attained after a hard fight, including hand to hand combat within the trenches, except for about 200 yards of enemy trench which included a machine-gun strong point, with 111 German prisoners and 3 machine guns being captured. At 9.30am on 4 February, a German counter-attack developed but was driven off, as was a further attempt at 4pm. At 12.30pm an enemy counter-attack massing on the Miraumont road was destroyed by artillery fire. During the afternoon, the division managed to seize another enemy strong point (at grid location R.2.a.4.6) but an attempt to a further one (R.1.a.5.5) was held up by enemy machine gun fire. The gap was in the enemy trench closed by 4pm on 5 February. (War diary, 63rd Division General Staff)
The operation – which has no officially recognised name – cost the British an officer and 22 men killed; 8 officers and 160 men wounded; and 6 men were missing.
Preparation for next attack, 5-16 February
2nd and 16th (Irish) Divisions carried out trench raids in support of these operations during 5 February.
During the period 6-16 February, the divisions of II Corps carried out a number of local operations, often only of company size, to improve the tactical position. The weather was fine and cold throughout. Grandcourt was found by patrols to be unoccupied and was seized on 7 February, and there was generally little resistance for a few days. Between 10-12 February, the Germans struck back and carried out a number of sharp raids and blunted a few more of the British probing attacks. British losses during these periods were not incosiderable. From 10 February, II Corps reported a total of 6 officers and 104 men killed; 27 officers and 526 men wounded; and 2 officers and 45 men were missing.
But it appears that at least one of the missing had actually deserted: German prisoners captured in the Miraumont action (below) said that he had given warning of the approximate time of the attack.
The British artillery had little chance to fire in the period after 10 February due to poor visibility, but on 1 February the II Corps Heavy Artillery fired over 3000 rounds on hostle trenches. Next day, the weather was again poor for shooting but 119 Heavy Battery had a successful day in firing to cut enemy barbed wire defences at Coffee Trench (its Forward Observing Officer Lieutenant Kennedy directed fire from a position in no man’s land, just 50 yards from his target)..
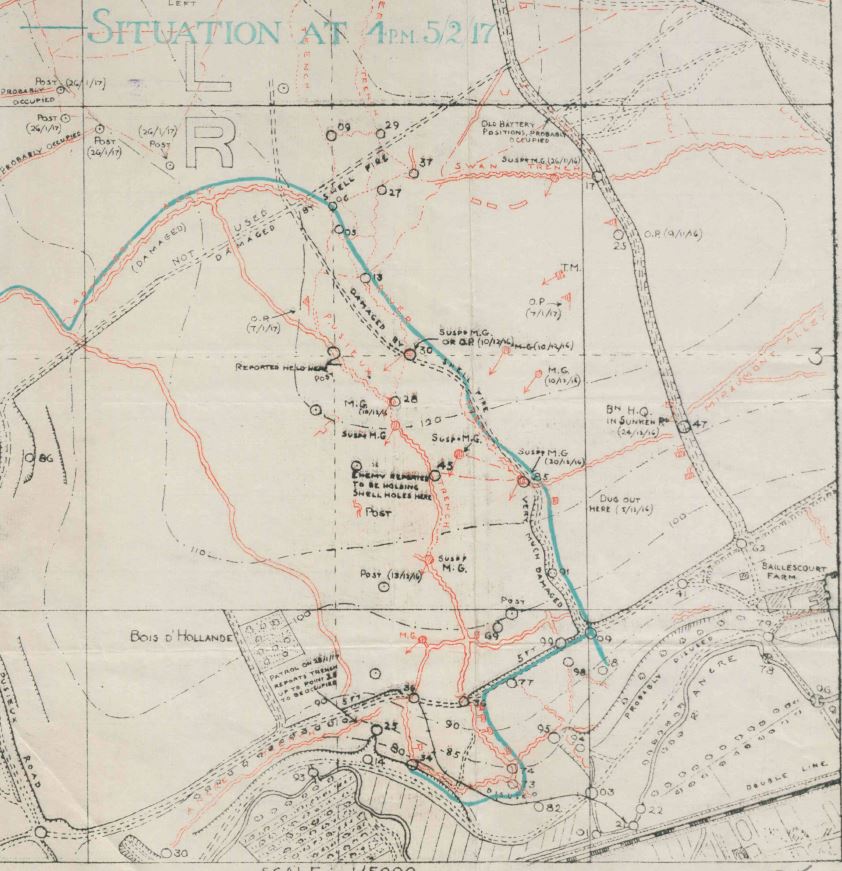
The Miraumont attack, 17 February
2nd and 18th (Eastern) Divisions would carry out an attack south of the Ancre and 63rd (Royal Naval) Division would mount a subsidiary attack north of it. The weather changed, being wet and misty, and ground thaw made condistions difficult.
Formation headquarters locations and command
- 2nd Division headquartered at Usna Hill (east of Albert) under Major-General Cecil Pereira
- 18th (Eastern) Division headquartered at Bouzincourt under Major-General F. Ivor Maxse
- 63rd (Royal Naval) Division headquartered at “Englesart” (SE of Englebelmer) under Major-General Cameron Shute
Objectives
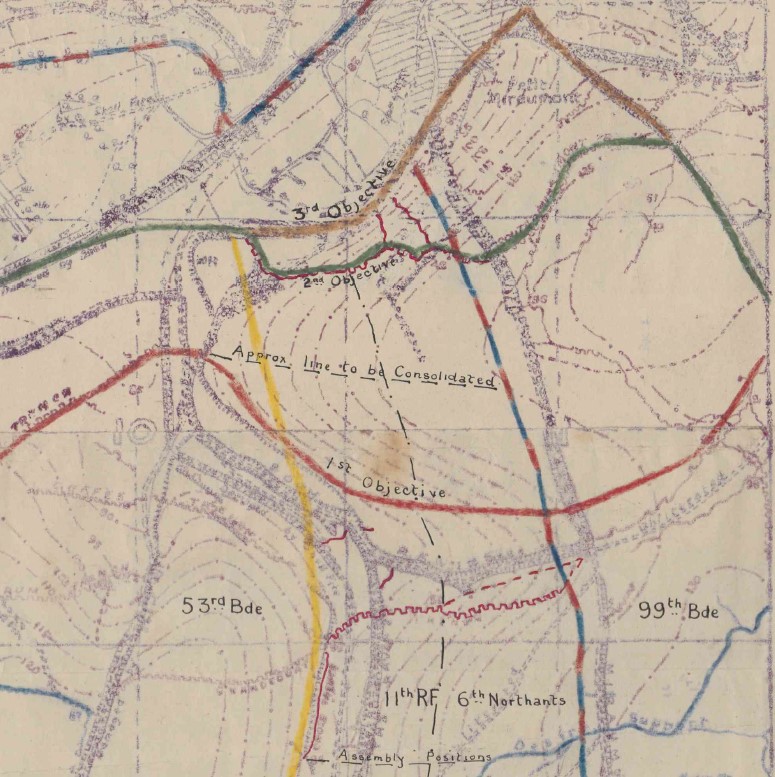
The objectives set were as follows:


Intelligence

Artillery
The Heavy Artillery under II Corps had recently been reorganised. It now consisted of eight Heavy Artillery Groups, four of which were for counter-battery work (that is, firing at German artillery) and four for siege work (firing on important locations and agains any efforts to organise to counter attack. They were:
| Heavy Artillery Group | Group Role | Batteries (all Royal Garrison Artillery unless indicated) |
|---|---|---|
| 2 | Siege | 71, 212 and 219 Siege Batteries (all 6-inch); 194 Siege Battery (8-inch); 129 Siege Battery (9.2-inch) |
| 9 | Counter-Battery | 24, 108, 119 and 152 Heavy Batteries (all 60-pounder); 8 and 189 Siege Batteries (6-inch Mark VII) |
| 10 | Counter-Battery | 72 and 211 Siege Batteries (6-inch); 36 Siege Battery (8-inch); 94 Siege Battery (9.2-inch); 63 Siege Battery (12-inch); 8 Battery Royal Marine Artillery (15-inch) |
| 25 | Siege | 27 and 157 Siege Batteries (6-inch); 20 Siege Battery (8-inch); 76 Siege Battery (9.2-inch) |
| 36 | Siege | 115 and 140 Siege Batteries (6-inch); 54 and 56 Siege Batteries (8-inch) |
| 40 | Siege | 17, 144 and 173 Siege Batteries (6-inch); 30 Siege Battery (8-inch); 62 Siege Battery (9.2-inch); 2 Battery Royal Marine Artillery (15-inch) |
| 45 | Counter-Battery | 23 and 73 Siege Batteries (6-inch); 33 Siege Battery (8-inch); 13 Siege Battery (9.2-inch); 80 Siege Battery (12-inch) |
| 55 | Counter-Battery | 114, 122, 132, 142, 146 and 156 Heavy Batteries (all 60-pounder); West Riding Battery 4.7-inch |
The detailed orders (targets, rate of fire, etc) given to each of the groups are contained with the war diary of II Corps Heavy Artillery. As an example, the orders for 2 Heavy Artillery Group were as follows, and their targets are illustrated below. All would open fire at zero hour:
- One of the 8-inch or 9.2-inch batteries: at one round per barrel every two minutes onto L.32.d.6.6 and the Sunken Road in R.3.b.
- One of the 8-inch or 9.2-inch batteries: at at one round per barrel every two minutes onto the Ravine R.4.a.40.42, the bank at R.4.b.2.0, the enclosure known as “the Thicket” at R.4.c.1.9
- One battery of 6-inch howitzers at one round per barrel per minute at South Miraumont Trench at R.11.a and R.5.d. until zero plus 1 hour 4 minutes, then onto Miraumont Trench R.6.c.2.6 to M1.1.d.2.0
- One battery of 6-inch howitzers at one round per barrel per minute at Below Trench M.7.b.8.3 to M1.d.3.0.
The counter-battery groups would open fire on all known enemy targets at zero plus 3 minutes.

If it proved possible to fly, six aircraft of 4 Squadron RFC and two balloons from 17 Kite Balloon Section would direct the fire of the Corps Artillery. Poor weather on the day rendered this impossible.

The field artillery deployed was to be as follows: 2nd Divsion would have its own artillery plus 23rd Army Brigade plus 10th and 14th Army Brigades borrowed from I ANZAC Corps; 18th (Eastern) Division would have its own artillery plus an Army Brigade and the artillery of 31st Division; 63rd (Royal Naval) Division would have its own artillery plus an Army Brigade.
Medical arrangements
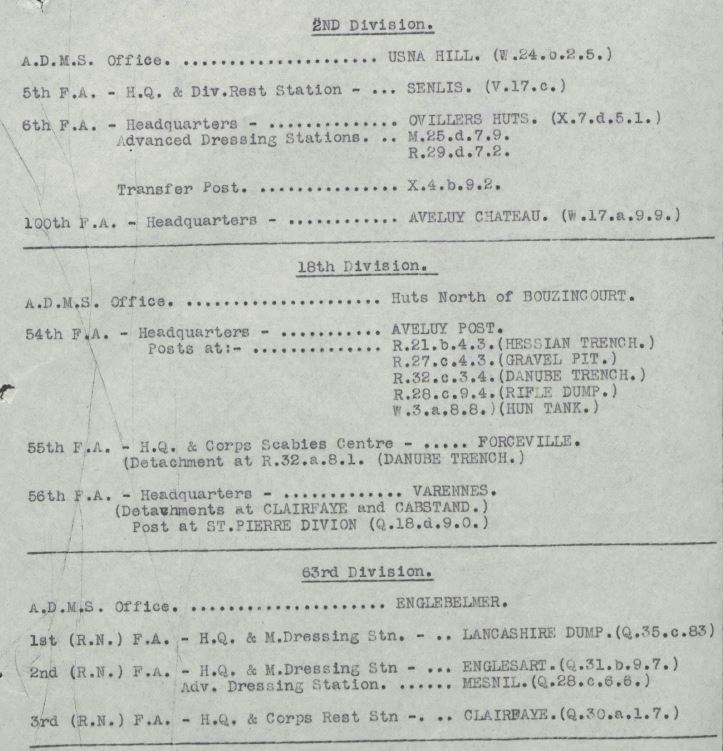
II Corps was to evacuate its wounded to the groups of Casualty Clearing Stations at Contay (9 and 49 CCS), Puchevillers (3 and 44 CCS), Varennes (4, 11 and 47 CCS) and Edgehill (45, 1/1st South Midland and 3rd Australian CCS). Abdominal and severe chest cases would go to Edgehill. Head injuries that did not need immediate operations at the Main Dressing Stations would be evacuated to 3rd Canadian Stationary Hospital at Doullens. Cases of suspected self-inflicted wounds would go to 3 CCS at Puchevillers. Those men who were sick and likely to recover within 14 days, other than those suffering from rheumatism, would not be sent to a CCS but to their relevant Divisional Rest Station. Rheumatic cases would go to the CCSs. Gassed cases would be evacuated to Englesart and shell-shocked men to Clairfaye. Wounded German POWs would, unless they were still required by Intelligence staff, would be evacuated down the same medical channels as the British (except for infectious disease cases, which would go to 2/1st Midland CCS at Recmenil Farm.)
26 Motor Ambulance Convoy, based at Bouzincourt, would provide the principal transport from Dressing Stations (operated by Field Ambulances) to the CCSs.
Locations of forward medical facilities at noon on 18 February 1917:
The attack of 17-18 February
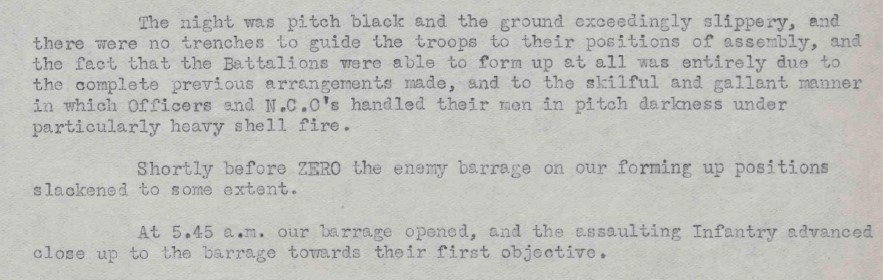
Operations began at 5.45am: the results were decreasingly successful from left to right. The day remained damp and misty.
63rd (Royal Naval) Division: division employed only its 188th Infantry Brigade to make its attack, and brigade placed the Howe Battalion on its right front and 1st Royal Marine Battalion in its left front. At 6.40am the Howe had reported that it had reached its objective; the Marines reported the same at 7.22am. At 7.30am, an attempted enemy counterattack was halted by artillery fire. By 9am, brigade was reporting “fairly large” numbers of German prisoners. casualties to the Marines were reported heavier than those incurred by the Howe Battalion. During the day, the work of consolidating the captured position continued and there was local fighting for certain strongpoints. German shellfire was heavy diuring the afternon, especially around 4.40pm. By 11pm, the German prisoners (unwounded) were confirmed as 1 officer and 105 men; (wounded) 1 officer and 40 men; and 2 machine guns had been captured. Brigade casualties were estimated at 700.
During a night of heavy and continuous rain, the brigade made contact with elements of the 18th (Eastern) Division on its right, and much barbed wire was erected in front of the new line.
At 11.25am on 18 February, two German battalions mounted a counterattack from the direction of the Wundtwerk. It was brought to a halt by artillery and machine gun fire, apparently with heavy loss. Division reported no casualties.
18th (Eastern) Division: division employed its 53rd Infantry Brigade, which it placed on its left front, and 54th Infantry Brigade on the right. They moved into assault position during the night 15-16 February.
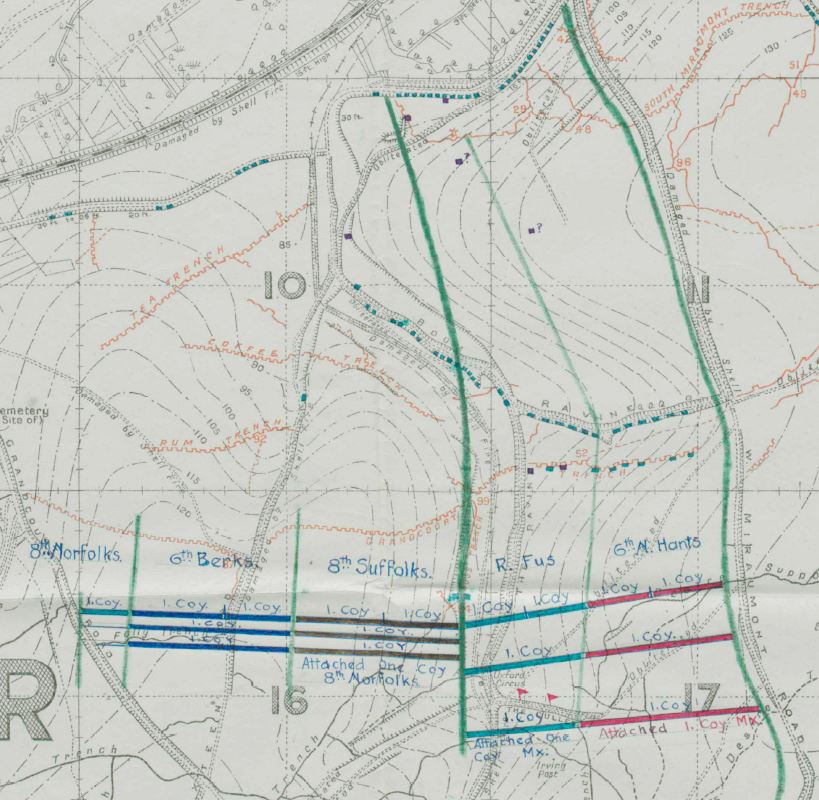
At 4am on 17 February, enemy artillery opened up a heavy barrage on 53rd Infantry Brigade’s front. Continuing for 1h15, it made the process of forming up for the attack very difficult and in places it was not completed until 5.30am. Things were already problematic due to the state of the ground, which was poor due to recent thaw. The heaviest bombardment fell on the left, hitting the 8th Norfolks and the left of the 6th Royal Berkshire.
When the advance began in the dark at 5.45am, the 8th Suffolks moved smartly on to Grandcourt Trench, encountering little opposition except from one enemy post. The 6th Royal Berkshire also advanced, reached Grandcourt Road and assisting in captuing the troublesome post. On their left, A Company of the 8th Norfolks initially lost direction, by under Captain Charles Ashdown MC they reorganised and gained their first objective by 6am.
As the brigade then pushed on towards Coffee Trench, the day was becoming lighter and the men could be observed. The trench was found to have strong barbed wire defences and was strongly held, as was Boom Ravine. Machine gun and rifle caused caused casualties and held up the advance.
On the right, 54th Infantry Brigade placed its 11th Royal Fusiliers on its left and 6th Northamptonshire Regiment on its right. They also came under the heavy German artillery barrage that the 53rd Brigade was experiencing in the hours before “zero”, and even getting into position proved to be a considerable task.
The advance proceeded reasonably well until it reached the barbed wire defences in front of Grandcourt Trench. The assault battalions found only a few gaps cut into these defences by the British artillery, and the delay in locating them and filtering men through gave the Germans the opportunity to man Grandcourt Trench and both sides of Boom Ravine. Companies began to get mixed up, direction was lost, and a shattering loss of officers rapidly led to a breakdown of cohesion. By the time the 11th Royal Fusiliers reached Grancourt Trench, all of its officers had become casualties and it fell on Company Sergeant Major 7479 Philip Fitterer to organise the advance. He was awarded the Military Cross “For conscpicous gallantry and devotion to duty. He took command of his company, re-organised his men together with those of other companies, and led them forward against the final objective. Later, although wounded, he refused to leave his post until the position had been consolidated.” (London Gazette 18 June 1917)
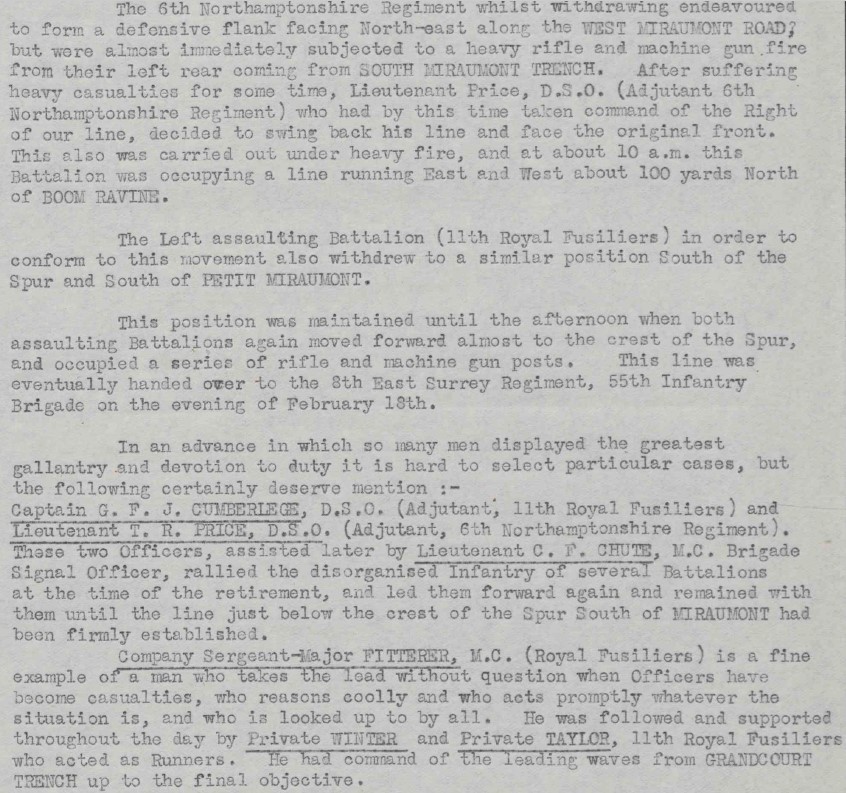
Boom Ravine was finally cleared at about 6.30am. The advance pressed on through the mud, while the 12th Middlesex regiment came forward to carry out the difficult job of clearing dugouts of any lurking enemy trrops. Some men of the 6th Northamptonshire got into South Miraumount Trench. The remnant of the 11th Royal Fusiliers could not get that far. Casualties were heavy, and by 8.30am whan a German counterattack emerged from Petit Miraumount and the Gully east of it, there were few who could resist it. They withdrew, espacially on teh area in the right of the brigade’s front. Germans taken as psiorner stated that the counterattack was delivered by a specially trained unit of marksmen and machine gunners (the developing counterattack tactics that would prove so troublesome to the British during 1917.)

Heavy artillery: mist made artillery observation problematic – two officers of 73 Siege Battery (Lieutenants Campion and Curry) went forward with the infantry and were able to communicate back to the battery and hence their group; it was also said that they twice rallied the infantry who had lost their own officers in the advance) .German artillery was kept “well under control” by counter-battery fire.
Medical: every available stretcher bearer had been pushed forward as far as possible and evacuation of wounded to the dressing stations proceeded well. Aveluy Post, which was also the receiving end of casualties coming 30 at a time by a trench tramway from the Thiepval-Pozières road, became congested with arrivals, particularly between noon and 4.30pm, by which time 150 men were lying out awaiting treatment. This was assigned in part that for some reason orderlies had not been permitted to do any dressing of wounds. The next 100 cases were diverted to Ovillers Huts and Lancashire Dump, and various adjustments to the routes and means of evacuation helped to gradually relieve the bottleneck.
Casualties
18th (Eastern) Division reported for the period noon 16 February to noon 18 February 1917:
| Killed | Wounded | Missing | ||||
| Unit | Officers | Other Ranks | Officers | Other Ranks | Officers | Other Ranks |
| 6th Royal Berks Rgt | 0 | 19 | 6 | 106 | 0 | 63 |
| 8th Suffolk Rgt | 3 | 22 | 3 | 91 | 0 | 14 |
| 10th Essex Regt | 0 | 2 | 1 | 13 | 0 | 0 |
| 53rd TM Battery | 0 | 0 | 0 | 3 | 0 | 0 |
| 53rd MG Company | 0 | 0 | 0 | 1 | 0 | 0 |
| 53rd Brigade Totals | 3 | 43 | 10 | 214 | 0 | 77 |
| 11th Royal Fusiliers | 3 | 36 | 13 | 159 | 0 | 70 |
| 6th Northamptons | 5 | 46 | 4 | 161 | 2 | 67 |
| 7th Bedfordshire | 0 | 8 | 0 | 0 | 0 | 0 |
| 12th Middlesex | 4 | 11 | 6 | 91 | 0 | 20 |
| 54th TM Battery | 2 | 7 | 0 | 5 | 0 | 2 |
| 54th MG Company | 0 | 7 | 2 | 7 | 0 | 2 |
| 54th Brigade Totals | 14 | 115 | 25 | 423 | 2 | 161 |

Sources
War diaries, all held by National Archives in series WO95:
- General Headquarters, General Staff (WO95/11)
- II Corps, General Staff (WO95/641)
- II Corps, Commander Royal Artillery (WO95/652)
- II Corps, Heavy Artillery (WO95/655)
- II Corps, Deputy Director of Medical Services (WO95/659)
- 18th (Eastern) Division, General Staff (WO95/2016)
- 63rd (Royal) Naval Division, General Staff (WO95/3093)